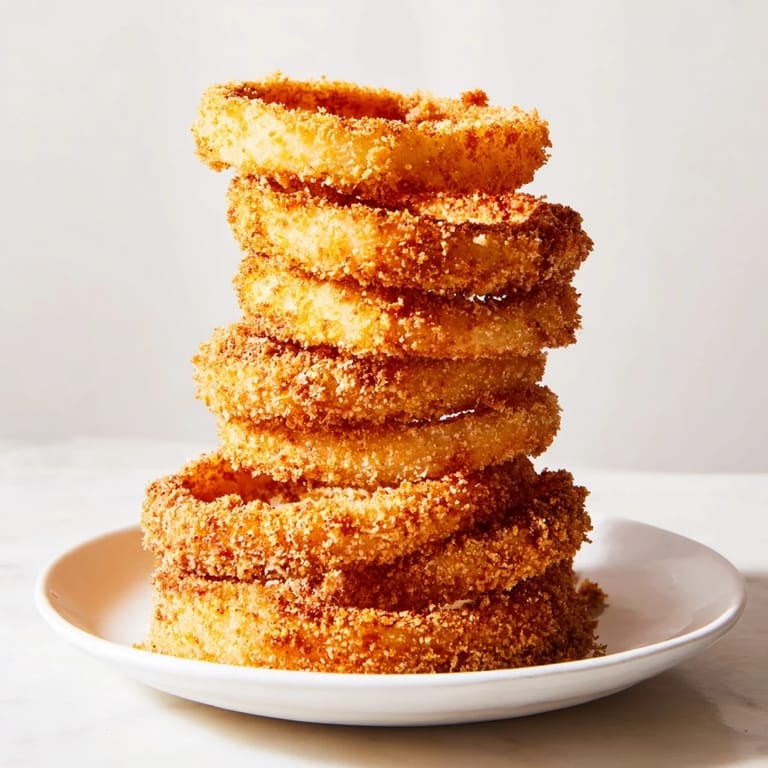
 Pin it
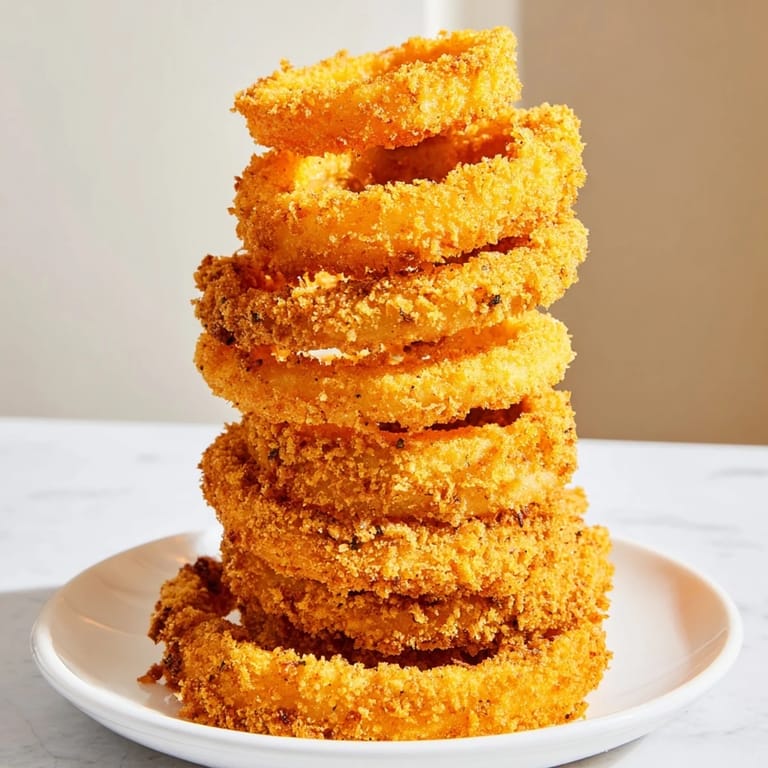
 My first attempt at stacking onion rings happened at a backyard party where I'd overcommitted on appetizers. Someone dared me to make them stand up like a tower, and after frying batch after batch until my kitchen smelled like a carnival, I accidentally created something that became the star of the night. The trick, I learned, was using thick-cut rings and a batter that clung just right—crispy enough to hold their shape but delicate enough to shatter between your teeth. Now whenever I make them, I'm chasing that same magic of texture and flavor.
I made this tower for my neighbor who'd been bringing us fresh vegetables from his garden all summer. When I stacked the rings up and watched his face light up, I realized it wasn't just about the food—it was the presentation, the effort, the little surprise of something unexpected on a Tuesday evening. He asked for the recipe before even tasting them, which told me everything I needed to know.
Ingredients
- Large yellow onions (2): Choose ones that feel firm and heavy for their size—watery onions mean watery rings, and thick slices are your foundation for that satisfying crunch.
- All-purpose flour (1 cup): The base of your batter, creating structure and helping everything bind together before frying.
- Cornstarch (½ cup): This is the secret to extra crispiness—it fries up lighter and crunchier than flour alone, giving you that shattered-glass texture.
- Baking powder (1 teaspoon): Creates tiny air pockets in the batter that puff up during frying, making rings that feel almost hollow inside.
- Smoked paprika (1 teaspoon): Adds a subtle warmth and depth that regular paprika won't—you'll taste it beneath the salt, not overwhelming the onion flavor.
- Garlic powder (1 teaspoon): Rounds out the savory notes without any of the moisture fresh garlic would introduce.
- Salt (1 teaspoon) and black pepper (½ teaspoon): Season boldly here because frying mellows spices slightly—taste the batter on your finger after whisking and adjust if needed.
- Cold sparkling water (1 cup): The carbonation creates that extra-light, almost feathery coating—tap water won't give you the same lift, so don't skip this detail.
- Eggs (2 large): Bind the batter and add richness; cold eggs mixed with cold water keep the batter temperature down so it fries faster and crisps better.
- Panko breadcrumbs (2 cups): The textural element that catches the eye and your teeth—panko's larger flakes give you those golden-brown shards instead of a uniform crust.
- Vegetable oil: For deep-frying, use oil with a high smoke point like vegetable, canola, or peanut oil; avoid olive oil, which burns and tastes bitter.
Tired of Takeout? 🥡
Get 10 meals you can make faster than delivery arrives. Seriously.
One email. No spam. Unsubscribe anytime.
Instructions
- Slice your onions thick and patient:
- Peel the onions and cut them into ¾-inch rings—any thinner and they'll collapse, any thicker and the inside won't cook through. Separate each ring gently with your fingers; they'll naturally break into the perfect bite-sized pieces as you handle them.
- Build your dry mixture:
- Whisk together flour, cornstarch, baking powder, smoked paprika, garlic powder, salt, and pepper in a large bowl. This is where all the flavor lives before it hits the oil, so don't rush—mix it thoroughly so the spices distribute evenly.
- Make a smooth batter:
- Beat the cold eggs and sparkling water in another bowl until combined, then pour into your dry ingredients and whisk just until smooth—lumps are okay and actually help, but overmixing develops gluten and makes the coating tough instead of tender. If it looks too thick to coat, add water a splash at a time.
- Prepare your coating station:
- Pour panko into a shallow dish and set it next to your batter. You're about to establish a rhythm: batter, drip, crumbs, done.
- Coat each ring with care:
- Dip an onion ring fully into the batter, lift it out and let excess drain back into the bowl for a second or two, then roll it in panko until completely covered. The panko needs time to adhere, so don't rush this step—it's what creates that golden, crunchy exterior.
- Deep-fry for that carnival magic:
- Heat oil to 350°F (175°C) in a large, heavy pot or deep fryer—use a thermometer because this temperature is crucial. Fry rings in batches of 4 to 6, never crowding the pan, turning occasionally, for 2 to 3 minutes until they're golden brown on all sides. The oil will bubble and hiss, and that's exactly what you want. Drain each batch on a wire rack or paper towels so they stay crisp on the bottom.
- Or air-fry for a lighter touch:
- Preheat your air fryer to 400°F (200°C), arrange coated rings in a single layer without overlapping, spray lightly with oil, and cook for 8 to 10 minutes, turning halfway through. They'll be crispy but lighter than deep-fried, and there's almost no oil splatter to clean up afterward.
- Stack and serve immediately:
- The moment your rings are done, arrange them into a tower on a serving platter while they're still hot and crispy. The longer they sit, the more they'll soften—so get them in front of people fast and watch their faces light up the same way mine did.
 Pin it
 There's a moment during every batch when the onions finish cooking and you pull them out of the oil—that moment when the whole kitchen fills with a smell that's warm and salty and almost sweet. That smell is why people linger in the kitchen instead of moving to the dining room; it's why they can't wait for the tower to be stacked before they're already reaching for one.
The Science of Crispy Onion Rings
The reason sparkling water works better than still water comes down to chemistry. The carbonation creates bubbles throughout the batter, and when those bubbles hit hot oil, they expand and burst, leaving behind tiny air pockets. This creates a light, crispy crust instead of a dense, heavy one. Cornstarch plays a similar role—its larger starch molecules fry differently than flour's, creating a more delicate structure that shatters instead of bends. Together, they're why these rings feel special the moment they touch your teeth.
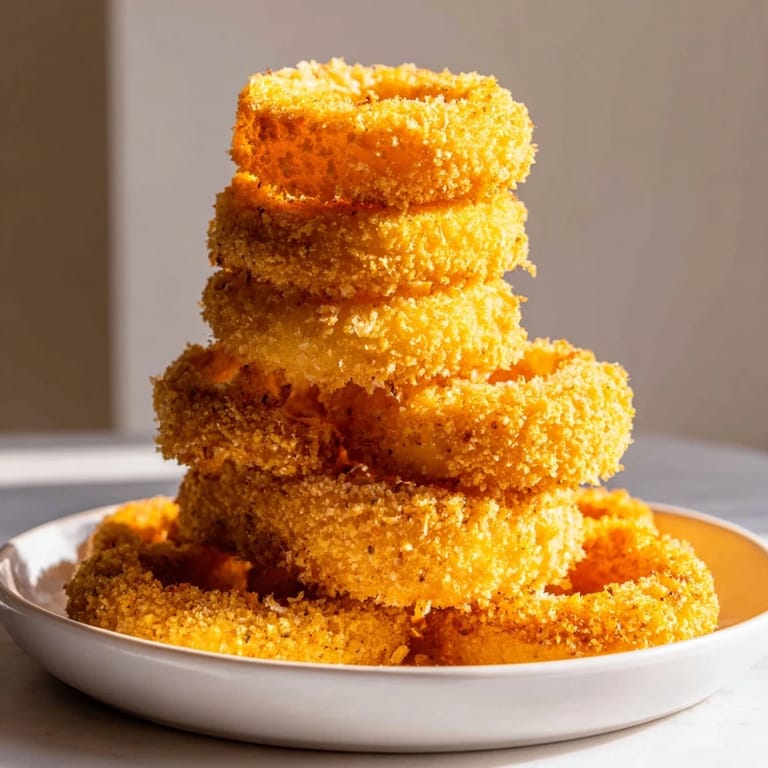
Stacking Without Collapse
The secret to building a tower that doesn't tumble mid-party is using the thickest, sturdiest rings from the middle of the onion for the base, and graduating to smaller rings as you build upward. An odd number of rings per layer looks more natural and stacks more stably than even numbers. Arrange them so each ring leans slightly against the next one, creating a cone shape—it's the same logic that makes log cabins stand without nails.
Dipping Sauces and Flavor Pairings
Onion rings are a blank canvas for whatever sauce speaks to you, which is part of why they're so endlessly appealing. A spicy mayo cuts through the richness of the fried coating and complements the natural sweetness of cooked onions. A classic ranch brings coolness and herbaceous depth. Even ketchup tastes right because it's tangy and cutting. If you're feeling adventurous, try mixing mayo with sriracha, or combining sour cream with fresh dill and a squeeze of lemon for something that tastes unexpectedly fresh after the heat of frying.
- Spicy mayo, ranch, or traditional ketchup are reliable classics that let the onion rings shine without competing.
- A drizzle of garlic aioli or a quick curry mayo transforms them into something unexpected that guests will ask about.
- Always set out multiple sauce options so people can taste the rings their own way—onion rings are one of those dishes where personal preference matters more than tradition.
 Pin it
 These onion rings have become my go-to when I want to bring something that makes people happy without requiring advance planning or special skills. They're loud and fun and a little bit indulgent—exactly what food should be sometimes.