 Pin it
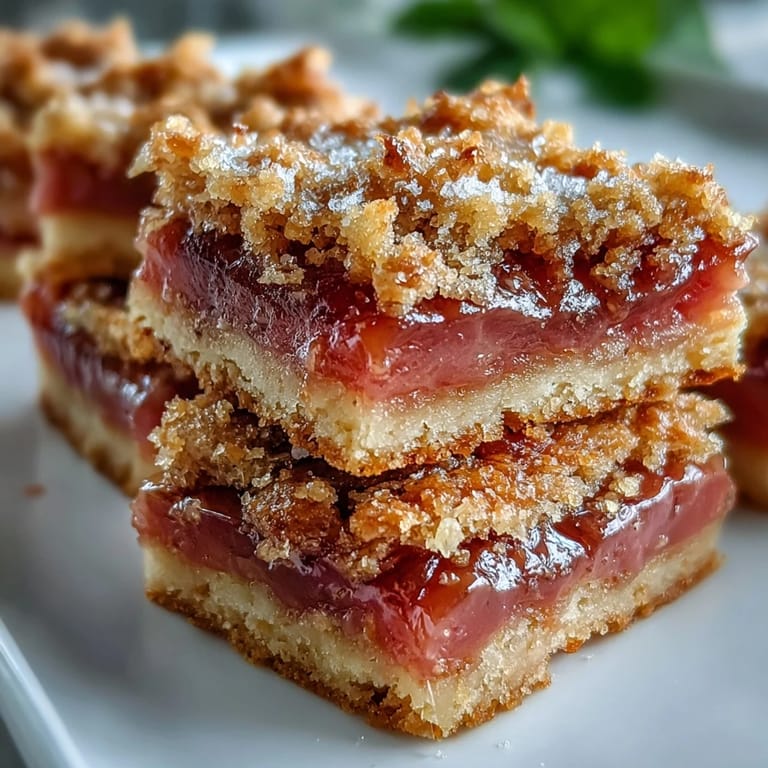
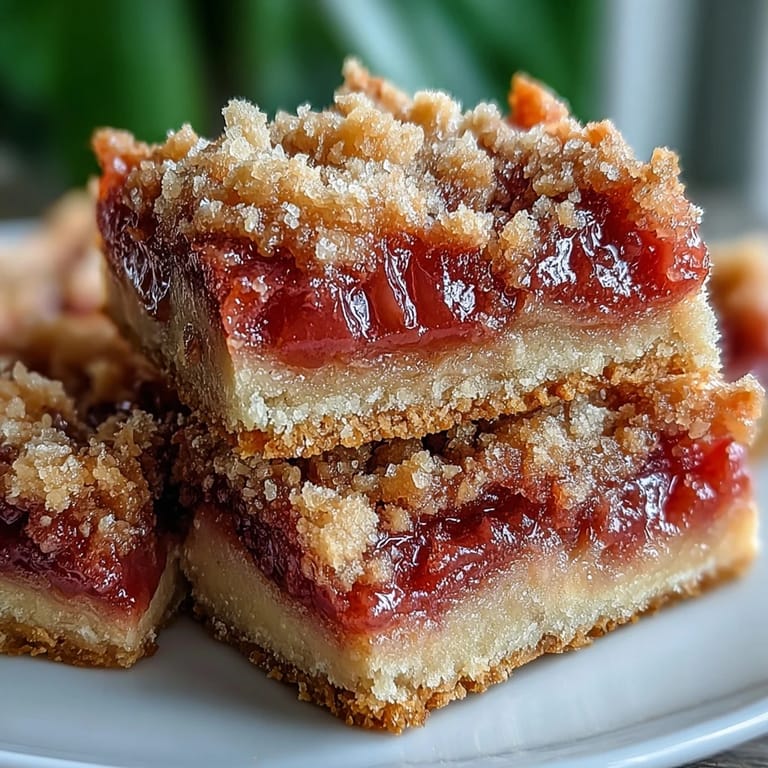
 My neighbor Maria handed me a plate of these guava bars one humid afternoon, and I bit into one without thinking—the contrast of buttery cake and that vibrant guava paste stopped me mid-chew. She laughed at my expression and said her abuela made them for every celebration in Havana, always stacking them high on a plate with a cup of strong coffee nearby. That day, I understood why these bars had traveled across oceans and generations, showing up at family tables like a small edible memory.
I made these for my daughter's school bake sale, and they disappeared in the first twenty minutes—someone actually asked if I had more in my car. That moment taught me that homemade pastries packed with real fruit have a magnetism that store-bought things just don't match.
Ingredients
- All-purpose flour (2 cups): The foundation that keeps everything tender—measure by spooning and leveling, never scoop straight from the bag, or you'll add too much and end up with a dense brick.
- Baking powder (1½ teaspoons): This gentle leavener gives you that delicate crumb without making the bars rise too much and crack.
- Fine sea salt (¼ teaspoon): A whisper of salt awakens the sweetness and balances the buttery richness perfectly.
- Unsalted butter (½ cup): Softened butter creams with sugar like a dream—if it's cold, your mixture will be grainy and sad.
- Granulated sugar (¾ cup): The sweetness that carries through the dough and lets the guava flavor shine instead of overwhelm it.
- Large eggs (3), at room temperature: Room temperature eggs incorporate smoothly and create a more tender structure—cold eggs seize the butter and create a lumpy batter.
- Vanilla extract (1 teaspoon): A small amount that adds depth without announcing itself, letting the guava take center stage.
- Whole milk (⅓ cup): The moisture that keeps each bite tender and prevents the cake from drying out as it sits.
- Guava paste (12 oz): The star of the show—look for the ruby-red kind that slices cleanly, and know that it thickens as it bakes, creating that jammy middle layer everyone comes back for.
Tired of Takeout? 🥡
Get 10 meals you can make faster than delivery arrives. Seriously.
One email. No spam. Unsubscribe anytime.
Instructions
- Get your oven and pan ready:
- Preheat to 350°F and line your 8x8-inch pan with parchment paper, leaving some overhang so you can lift the whole thing out later without wrestling or breaking the bars. This is your escape route—don't skip it.
- Mix the dry team:
- In a bowl, whisk flour, baking powder, and salt together, making sure there are no lumps hiding in the flour. This step aerates everything and prevents streaks of baking powder in your finished bars.
- Cream butter and sugar:
- Beat them together for about two minutes until the mixture looks pale and fluffy, almost like frosting—you're incorporating air, which makes the bars tender. Take your time here; this is where the magic starts.
- Add the eggs one by one:
- Drop in each egg and beat well before adding the next—this creates a stable, smooth batter that won't look curdled. Add the vanilla too, and let it get fully mixed in.
- Combine wet and dry gently:
- Alternate adding the flour mixture and milk, starting and ending with flour—this prevents overmixing, which would make the bars tough. Stir just until you don't see flour streaks anymore, then stop yourself from stirring more.
- Layer the first half:
- Spread half the dough evenly into your prepared pan, using a spatula or the back of a spoon. You're creating the base that holds the guava, so make sure it's relatively even.
- Add the guava treasure:
- Arrange guava paste strips in a single layer over the dough—you can lay them slightly overlapping or in neat rows, whatever makes you happy. Don't press down; just let it rest there.
- Top with the remaining dough:
- Gently spread the rest of the dough over the guava layer using a spatula or damp fingers—damp fingers work beautifully because the batter won't stick and tear. Make sure you cover the guava completely so it doesn't peek out and dry in the oven.
- Bake until golden:
- Slide it into the oven for 38 to 42 minutes—you're looking for a golden-brown top and a toothpick inserted into the cake part (not the guava) that comes out clean. The kitchen will smell absolutely divine during this time.
- Cool completely:
- Let the bars cool all the way in the pan—this is important because they set as they cool and won't fall apart when you cut them. Use those parchment handles to lift the whole thing out once completely cool.
- Cut and serve:
- Using a sharp knife, cut into 16 bars and arrange them on a plate. A damp cloth nearby helps you clean the knife between cuts and keeps everything neat.
 Pin it
 My uncle once brought these bars to a family dinner where everyone was stressed about money and work, and watching people's faces soften as they bit into one reminded me that sometimes the most healing thing you can offer is something made with actual care. There's a reason these have survived through generations and countries—they're simple enough to make repeatedly, but special enough to feel like a gift.
The Guava Paste Secret
Not all guava pastes are created equal, and this matters more than you'd think. The ones labeled as guayabate or pasta de guayaba tend to be denser and slice more cleanly than the spreadable kind—look for that ruby-red color and a paste firm enough to hold its shape. Once you find a brand you like, stick with it because consistency in your baking ingredient means consistency in your results.
Variations That Work Beautifully
These bars are flexible enough to bend to your mood or what you have on hand. A little grated lime zest stirred into the dough adds a tropical brightness that plays wonderfully with the guava, or you can mix the guava paste with a thin layer of cream cheese for something richer and tangier. I've also made them with a half-guava, half-mango paste combination when I was feeling experimental, and they were spectacular—the point is that the cake dough is forgiving enough to welcome different fruit friends.
Storing and Sharing Your Bars
These bars keep beautifully at room temperature in an airtight container for up to three days, which makes them perfect for bringing to work or sharing with neighbors. If you want them to last longer, wrap them individually in parchment paper and freeze them—they'll stay good for a month and thaw in about an hour at room temperature.
- Stack them in a pretty box or tin for gifting and people will think you've been baking professionally.
- They're best eaten within a few hours of baking if you want that fresh-baked softness, but they're still delicious on day two or three, just slightly firmer.
- Pair them with strong coffee, tea, or a cold glass of milk for the complete experience.
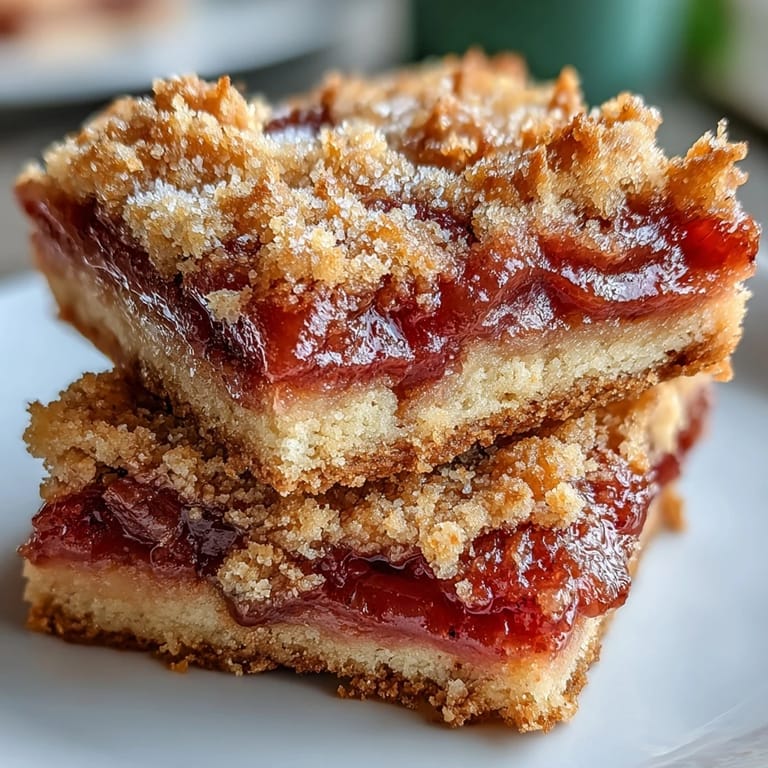 Pin it
 These guava bars carry stories—of grandmothers in Havana kitchens, of neighbors sharing recipes like treasure maps, of bake sales and family dinners where everyone reaches for seconds. Making them is how you join that conversation across time and distance.
Recipe FAQs
- → Can I use fresh guava instead of paste?
Guava paste is recommended for its concentrated sweetness and thick texture. Fresh guava would release too much liquid and alter the structure of the bars.
- → How do I know when the bars are done baking?
The top should be golden brown, and a toothpick inserted into the pastry (avoiding the guava center) should come out clean. The edges may start pulling slightly from the pan.
- → Can I freeze these guava bars?
Yes, wrap cooled bars tightly in plastic and foil, then freeze for up to 3 months. Thaw overnight at room temperature before serving.
- → What's the best way to cut clean bars?
Let the bars cool completely in the pan. Use the parchment overhang to lift them out, then wipe your knife clean between each cut for neat edges.
- → Can I add cream cheese to the filling?
Absolutely. Spread softened cream cheese over the guava layer or blend it with the paste for a creamier, tangier variation that balances the sweet fruit.