 Pin it
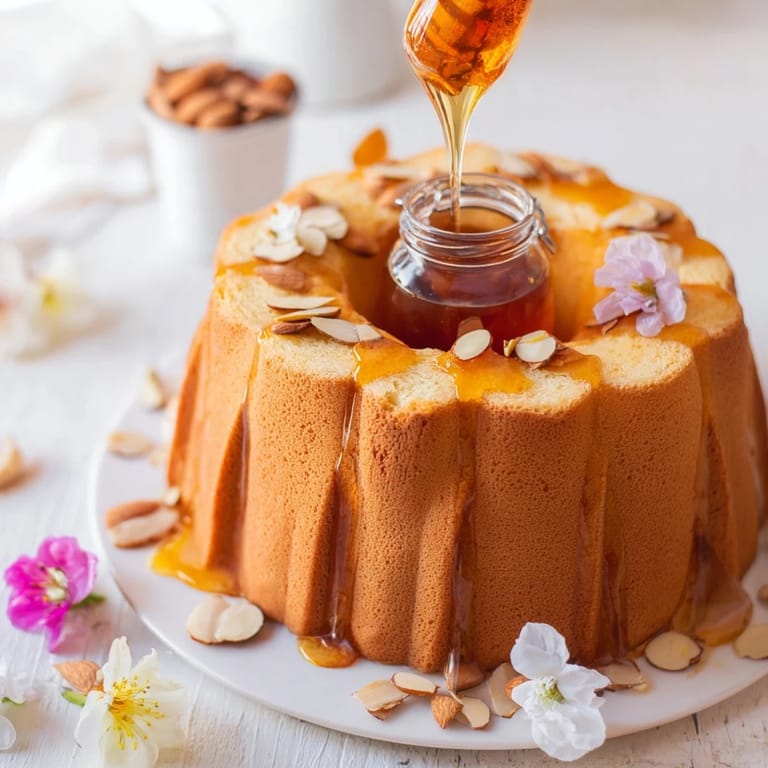
 The first time I made this, I was mesmerized by the idea of honey flowing from the center of a cake, transforming a simple dessert into theater. I'd seen it done at a restaurant and couldn't shake the image—that golden ribbon of sweetness catching the light as someone tore into warm cake. I spent weeks imagining how to pull it off in my own kitchen, and when I finally got it right, my kitchen smelled like caramelized butter and wildflower honey for hours.
I made this for my sister's birthday dinner, and I remember being absolutely terrified about whether the honey pot would stay in place. I fussed with it for five minutes before she arrived, repositioning it three times. Then everyone sat down, and the moment someone dipped their first bite into that warm honey, all the anxiety dissolved—there was just laughter and the sound of forks clinking against the serving platter as people reached for another piece.
Ingredients
- All-purpose flour: This is your cake's foundation, and you want it measured by weight if you can manage it—spooning and leveling prevents the dense cake that happens when people pack flour into their measuring cups.
- Baking powder and baking soda: They work together here to give you a tender crumb that holds up to the honey cream without getting soggy.
- Unsalted butter: Softened butter creams better with sugar and lets the honey flavor come through without competing saltiness.
- Honey: Choose something with character—wildflower or acacia adds complexity that plain clover honey can't quite deliver.
- Eggs: Room temperature eggs incorporate smoothly into the batter, which means a more uniform cake texture.
- Mascarpone cheese: This is the secret that makes the honey cream taste luxurious instead of just like sweetened whipped cream.
- Heavy cream: Cold cream whips better, so keep it in the fridge until the last possible moment.
- Toasted almonds: Toasting them yourself takes three minutes and transforms them from bland to nutty and necessary.
Tired of Takeout? 🥡
Get 10 meals you can make faster than delivery arrives. Seriously.
One email. No spam. Unsubscribe anytime.
Instructions
- Prepare your pans and preheat:
- Grease and line two 8-inch round cake pans, then get your oven to 350°F. This temperature bakes the cake gently enough that it stays moist while the edges set properly.
- Mix your dry ingredients:
- Whisk together flour, baking powder, baking soda, and salt in one bowl—this distributes the leavening evenly so you don't get odd rises or sinking spots.
- Cream butter and sugar:
- Beat them for about three minutes until the mixture is pale and fluffy. This incorporates air that helps the cake rise and keeps it tender.
- Incorporate honey, eggs, and vanilla:
- Add them to the creamed mixture and beat well—you want everything fully combined and pale yellow. Don't rush this step.
- Alternate wet and dry ingredients:
- Start with flour mixture, then milk, then flour again, always starting and ending with dry. This prevents overmixing, which is the enemy of tender cake.
- Divide and bake:
- Split the batter evenly between pans and bake for 22–25 minutes until a toothpick comes out clean. The cake will still feel slightly tender when you touch it—that's perfect.
- Cool completely:
- Let the cakes cool in pans for 10 minutes, then turn them out onto racks. They need to be fully cool before you slice them, or they'll crumble.
- Make your honey cream:
- Whip cold heavy cream to soft peaks, then fold in honey and mascarpone—don't overbeat or it'll turn grainy. Chill it while you prepare the cake layers.
- Slice and stack:
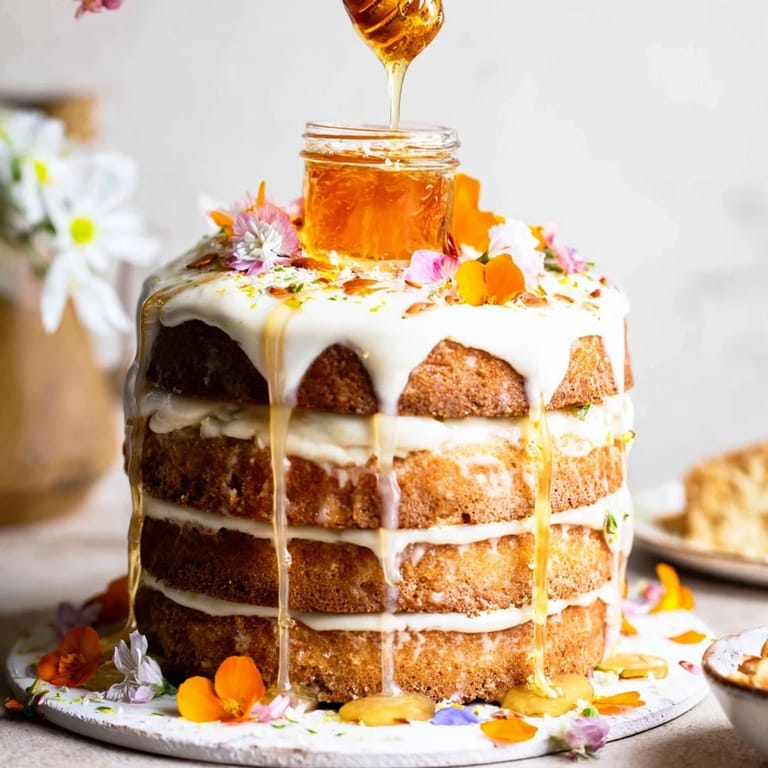
- Cut each cooled cake horizontally to make four thin layers total. Layer them on a serving platter, spreading honey cream between each one.
- Cut the center hole:
- Use a 3-inch round cutter to carefully punch a hole through the center of your stacked cake. Go slowly and wiggle it gently to avoid crumbs falling into the filling.
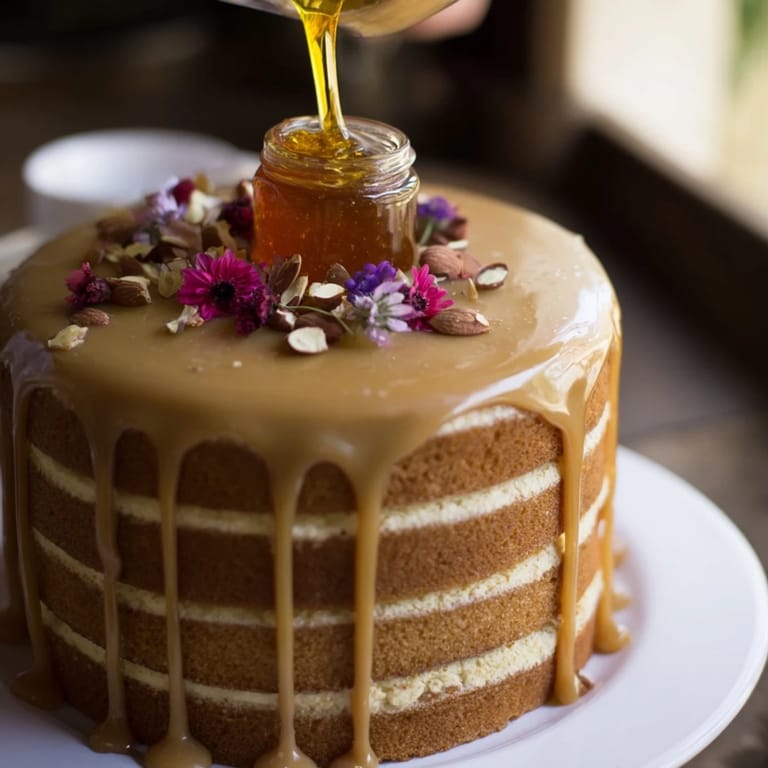
- Place the honey pot:
- Set your small glass or ceramic pot into the hole and fill it with high-quality liquid honey. Test that it's stable before anyone touches the cake.
- Garnish and serve:
- Top with toasted almonds, edible flowers if you have them, and a final drizzle of honey around the edges. Encourage guests to slice and dip each bite into the warm center.
 Pin it
 This dessert stopped being just dessert for me the afternoon my nephew watched a guest take that first bite into the honey center and got genuinely excited about trying to make it himself someday. That's when I realized it wasn't about technical skill or fancy ingredients—it was about creating something that makes people lean in closer.
Choosing Your Honey Wisely
The honey you pour into that center pot deserves attention because it's on full display. Wildflower honey brings subtle floral notes that pair beautifully with cake, while acacia honey is lighter and lets the vanilla shine through. Some people swear by orange blossom or lavender honey for something more adventurous. I've experimented with all of them, and honestly, you can't go wrong as long as it's liquid and something you'd actually enjoy tasting on its own. The quality matters here because there's nowhere for it to hide.
Building Layers That Hold
When I first tried horizontal slicing, my cakes were slightly too thick and wanted to slip around. I learned to slice more deliberately and to chill everything between steps—the cold honey cream acts like an adhesive, and cold layers are more stable. Take your time with this part because three perfect layers stack more gracefully than four uneven ones. You can also make this cake a day ahead and let the layers set up overnight, which actually makes assembly easier.
Wine Pairings and Final Thoughts
The restaurant where I first saw this served it with Moscato, and that pairing stuck with me because the wine's sweetness echoes the honey without competing with it. A late-harvest Riesling works beautifully too if your guests prefer something slightly drier. The interplay between warm honey, cool cream, and that first sip of wine is part of what makes this dessert feel special.
- If almonds aren't your thing, try crushed pistachios or even candied hazelnuts instead.
- Make sure your honey pot won't tip—test its stability on the actual cake before guests arrive.
- Serve this while the honey is still warm for the maximum visual impact and that gorgeous dripping moment.
 Pin it
 This cake is one of those rare desserts that tastes as good as it looks, which is saying something. Make it for someone who deserves that moment of joy watching honey pour into their slice.
Recipe FAQs
- → How do I create the honey pot center?
Cut a 3-inch round hole from the stacked cake layers and place a small glass or ceramic pot filled with liquid honey into the cavity. This allows guests to dip each bite freshly into warm honey.
- → Can I substitute the honey with another sweetener?
While honey is key for flavor and texture, mild alternatives like maple syrup might work but will alter the character and consistency of the cake and filling.
- → What type of honey is best to use?
Wildflower or acacia honey is preferred for their delicate floral notes, which complement the cake’s sweetness without overpowering it.
- → How should I store this layered cake?
Keep refrigerated to maintain cream filling freshness and honey texture. Remove from fridge 20 minutes before serving for best flavor.
- → Is it possible to make this cake nut-free?
Yes, simply omit the toasted almonds garnish to accommodate nut allergies without impacting the main structure or flavors.